Sunday, December 9, 2012

DIY Christmas; Apron edition


I've never been big on all of the gifting of Christmas. Maybe it just was the way I was raised or how ridiculous society becomes around the holidays. Whats even more ironic that less than a month after we discuss how thankful were are, everyone begins a pissing contest to see how many presents little Suzie can get. Every year needs to be bigger and better than the last and more expensive. Meanwhile, people are starving in countries and you just bought your five year old 500 dollars worth of Christmas gifts that she will grow out of, not appreciate, and not remember in less than 5 hours. Furthermore she will be more impressed with the box that her easy bake came out of than the oven itself.....I digress.

I am not the Christmas Grinch nor am I to frown upon buying your loved ones something, I just think that there needs to be some thought in it. And sometimes the most thoughtful and appreciated gift, is something that you can make.

I have an apron that I made 4 years ago that I just adore. So much that I haven't worn it while cooking because I am too afraid it will get dirty; yes I'm one of those people. There are a few loved ones in my life who love to cook and love my apron so I decided this year that I few aprons were in order. This is a very easy DIY. Anyone who can sew a straight line can do this. And my words of wisdom are this: "Just use the damn iron!". I spent years fighting using the iron, why I don't really know. I always thought it takes to long to heat up (it doesn't), I'll burn myself (you might), It's not going to make that much difference (it will).

As you might of already figured out by now I do everything by the seat of my pants. I don't really follow directions well and sometimes I just make them up. Because of that my instructions aren't as good as they could be, because sometime I don't even know what I did. As I learned from my dad; just eyeball it. That ensures everything is unique.


I bought 2/3's of a yd from Joann's in a lovely elephant motif. I know elephants don't really scream cooking, however if you knew my friend you would know how much she loves them. I also bought a coordinating purple tie dye fat quarter to make the band.

In order to determine the length and width of the apron I just put the fabric around my waist and 'eyeballed' it. I cut the fabric into in rectangle. Afterwards I ironed 1/4 of and inch around the edges twice, except for the top, I left it raw. That way the fabric cannot fray at all on the bottom or sides. I then sewed the rolled edges. Then I cut the 3 strips of the purple band 6 inches wide. I sewed them together, in order to make one long strip. Iron the seams flat, then roll all of the edges 1/4 and then another 1/4. Iron the purple fabric so it is a 'hotdog' down the center, this will make it easy to sew. Next I measured the center of my elephant fabric, it was 12 inches. Then I pinned the center of the purple fabric onto the 12 mark. The purple fabric is 'holding' the elephant fabric. In other words the top of the elephant fabric is inside of the purple fabric creating a band. Pin then sew.

Wrap in a pretty package and your're done! All for under 10 dollars and about an hour of time.

The heart on the blue and yellow apron was done using reverse applique. I drew a heart on the back  of the red fabric. Pinned it on the back of the blue fabric (red right side pinned to blue 'wrong' side), I sewed the heart. Then cut the heart out on the front of the blue fabric, to allow the red to show through. Let me know if you want a tutorial. :) 


Friday, December 7, 2012

My Ways of Procrastination & Lemony Pasta

Studying for finals this week has begun. And it's killing me. All of the various forms of procrastination are happening all at once. The need to sew, craft, cook, bake, pin, facebook, instragram, tumblr, blog! And sadly the list goes on.

In honor of studying I'm posting some of my favorite things from procrastinating this week. And they say you waste it on nothing. :)

How do I put this gently  is a wonderful tumblr for anyone is school. It's not just for us Masters. hah.

What should we call SLP  is a great site if you are immersed into the auh-mazing world of speech language pathology.

A glance at my week of pinning. Follow me ya'll!

Bulletprooffffff! 

These would be a very easy DIY with some thrift store gloves and studs. 


I am in abso-freaking-lutely in love with these leggings. Damn you people who pin from google images! 

At the current moment I am dreaming of being anywhere but here needing to study for the impending doom of finals. Dun dun dun. 

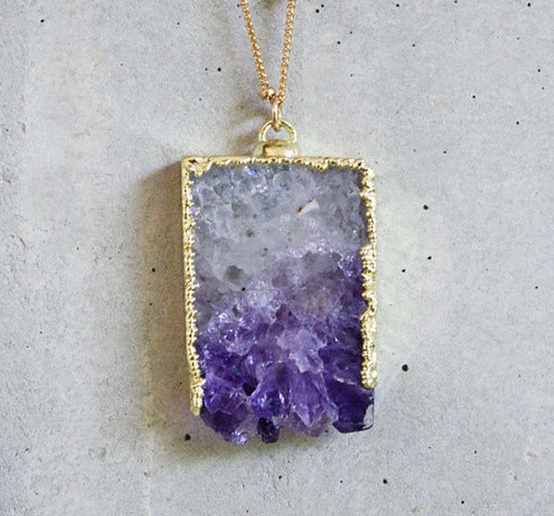
Okay people at Kei Jewelry, I am in love IN LOVE with this necklace and it's my birthstone. That means you're supposed to give it to me, right?! 

One of Martha's DIY's. So Chic. I wish making jewelry didn't scare me so much! 

I call this rainbow on my neck. Apparently the real name ist Bib of many colours. Mine's better. ;) 
As if you needed one more distraction, I present you with this delightful recipe:

Lemony Pasta

Boil 1/2 pound of pasta (I did fettuccine, linguine or capellini would work too) in well salted water.

In a small saucepan zest 3 lemons, juice 2. Add 2 tablespoons of olive oil, 2 tablespoons heavy cream, salt, pepper, and 1/2 cup freshly grated parmigiana cheese. If desired add 1-2 teaspoons red pepper flakes.

Bring to a gentle simmer.

Drain pasta reserving the water. Add 1/4 cup of the water to the lemon cheese mixture.

Allow to simmer another minute

Add 1/4 cup of thinly sliced green onions.

Toss with warm pasta. Top pasta with parmigiana cheese if desired.

Bon Appetite!


Whats your favorite way to procrastinate? Do you have a favorite snack when you are studying?


Thursday, December 6, 2012

Low Carb Stuffed Peppers

Ready to get baked


As finals creep up my fridge gets sorrier and sorrier. What do you do with 2 lonely yellow bell peppers and 3/4 of a pound of 97% lean ground beef?

Why you make stuffed peppers of course!

The line up! Excuse my messy kitchen, Finals are coming up remember!

I made these on the fly, combining things I've seen while perusing the internet and how my momma has always made them.

Stuffed Peppers

2 bell peppers, any color 
1/2 red onion
2 garlic cloves
1/4 head cauliflower
2 teaspoons red pepper flakes (I like it hot!)
3/4 lean ground beef
salt & pepper
1 tablespoon olive oil
1 tablespoon tomato paste 
Sharp cheddar cheese (optional) 

  1. Add the olive oil to a skillet and head on medium high. Add the ground beef. Mash up with your spatula to break apart the beef. Season with salt, pepper, and red pepper flakes. 
  2. In the food processor grate the cauliflower. Add to the almost cooked beef. Add the onion and garlic to the food processor and dice. (Don't bother washing the food processor out, everything is going to the same place!) Add the garlic/onion mixture to the beef and the tablespoon of tomato paste
  3. Allow to cook over medium low heat for 3-5 minutes.
  4. Preheat the oven to 375. While everything is mingling get a medium sized pot and fill it with water. Salt liberally. Place it over high heat and allow to boil. Once boiling add the peppers one at a time (unless you have a big pot!) and boil for 3 minutes. Remove from the hot tub and they are ready to stuff. 
  5. Spray a pan with a little cooking spray. I found that because I used only two peppers my mini loaf pan  fit the two peppers perfectly, if you have one use it. A muffin pan might work too! Stick the peppers in there. Add the ground beef mixture (you will have some left over, really enough for another pepper; my boyfriend was more than happy to eat it though while he was waiting on the peppers to come out of the oven). Top with cheese if desired.
  6. Pop in the oven and bake for 15 minutes. No need to bake for a hour because the meat is already cooked and the peppers have been softened a little already from their bath. 
While everything was baking I decided that the peppers needed a little sauce. I did not measure anything out for it so this is just a guesstimate. Don't sue me. :) 

Add 3 tablespoons of tomato paste to a skillet. Add 1 teaspoon olive oil and 1/2 cup of water. Break up the paste. Salt and pepper liberally. Add tabasco sauce to taste. Simmer until warm. If you want it thinner add a little more water. Otherwise its done-ski.

Top your peppers that just came out of the oven and enjoy your no refined carb dinner.  

Bon Appetit! 


Cauliflower ground down but not pureed.